Well, I’m finally done. Those Daring Bakers are really putting me to the test and this month’s challenge was no walk in the park. Brilynn of Jumbo Empanadas decided to test our culinary skills by asking us to make a Darkest Chocolate Crepe Cake from Martha Stewart. As I looked at the four-page recipe, I had inkings that this was not going to be any ordinary cake. I thought the recipe looked a little wacky and perhaps that’s why I procrastinated and left it to the last few days in April.
The cake is made up of three components; chocolate crepes, hazelnut crème filling and chocolate ganache. The crepes were a breeze to make though I had to do a little trimming to make everything circular. They didn’t stick or rip which I am very thankful for. Out of the 36 I made, I only ended up using 18. The crème was a little labour intensive but not difficult. It is a meringue-type hazelnut crème for which I used hazelnut butter instead of hazelnut cream. It was light and airy like a mousse and tasted very yummy. The difficulty started when I began assembling the cake.
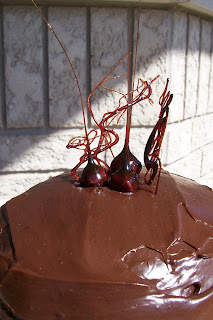
After the crepe/crème tower was complete, it started to lean which freaked me out. (Had the filling been more like an icing, this probably wouldn’t have happened.) Filling was spilling out everywhere so I propped it up with 4 straws and put it in the fridge, took a deep breath and made the ganache. I cleaned up the cake as best I could and covered it in the chocolate. The final result is not very even or flat on top. It’s more dome-like but I finished and I was relieved, though slightly frustrated.
Well, the final result (including taste and appearance) turned out okay. The layers are not ultra distinct but you can see them. I also made the candied nuts to put on top. As you can see from the picture, I turned my back on the sugar for a second and it got very dark amber. I thought that since it was just for decoration I would use it. I don’t think I’ll ever make this cake again and I truly believe the parts are much better than the sum product. Everything tasted nice, but perhaps not all together. Overall, I’m glad I tried it. I’m also glad I have a neighbour with family over who I could share the cake with. If you’d like to see what the other Daring Bakers came up with, just click on the links in the sidebar. There are some truly spectacular cakes to behold!
Pages
▼
Sunday, April 29, 2007
Wednesday, April 25, 2007
Dutch Butter Bars
Spring has finally sprung in Ontario. Tulips are almost blooming and buds are appearing on my lilac bush. Along with the good weather comes busy times at work and less time to bake. I did, however, find time to make some bars which I will share with you.
Dutch Butter Bars (known in Dutch as boterkoek) are a simple satisfying bar. They're reminiscent of shortbread and have a chewy texture. The almond flavouring compliments the buttery bars very well and the scattered almonds on top add some crunch. Just remember, overbaking will make the bars too crispy. I didn't overbake, but my edges were still well done, almost like biscotti. Also, the consistency of the dough was more like cookie batter. It was not spreadable so I had to pat the dough into the pan.
Overall, the bars were tasty and I would make them again and bake them for a little less time. For some sparkle, sprinkle coarse sugar on top and enjoy with a nice hot drink.
Recipe: Dutch Butter Bars
Monday, April 16, 2007
Maple Nut Upside-Down Cake
This past weekend I found myself with enough free time to get engrossed in baking. The house was quiet and clean - ideal for trying something new. I had already picked out what I was going to tackle - Maple Nut Upside-Down Cake.
After looking through my cupboard earlier, I found about five different types of nuts waiting to be used; macadamia, pine nuts, walnuts, pecans and almonds. A perfect combination for a mix. After reading the recipe, I saw that it was assembled just like any other upside-down cake; by creating a syrup, sprinkling with nuts and topping with cake batter. An interesting thing about the cake was that it used no butter or oil. I couldn't remember the last time I made a cake with no butter but I had a feeling it would be just fine.
Well, the cake didn't disappoint. It looked pretty impressive with the glazed nut top and it was easy to lift off the pan. The syrup soaked into the cake making it moist and sweet. I found that it tasted even better the second day after all the flavours had time to settle. You can use any mixture of unsalted nuts you like and if you top it off with some whipped cream, you'll have a fabulous dessert to share with friends.
Recipe: Maple Nut Upside-Down Cake
Tuesday, April 10, 2007
Golden Vanilla Layer Cake with Chocolate Fudge Frosting
This is the third time I've made this cake. The first was for a birthday, the second for a dinner party and the third was also for a birthday which happens to be today. It is a classic layer cake - light, fluffy and golden with chocolate frosting.
The cake comes from Chocolate & Vanilla by Gale Gand and I really love it. The recipe seems a little finicky but you most definitely do not need a fancy mixer to whip it up. Just note that the frosting just covers the cake - you won't have any leftover. Add some ice cream and you have one of the best desserts ever.
So if you want to do something special for someone you know bake them a cake and if your birthday is today, Happy Birthday!
Recipe: Golden Vanilla Layer Cake with Chocolate Fudge Frosting
Thursday, April 05, 2007
My Ambrosia
One of the desserts I remember eating when I was young was Ambrosia. It is a cool melange of chewy marshmallows and juicy fruit all held together by a white cream, most likely Cool Whip. I loved how the marshmallows would soften up and I have never been known to refuse a maraschino cherry. I wanted to recreate it so I went looking for a recipe.
Well, the Internet was very helpful, giving me multitudes of recipes. Some with nuts, some using sour cream or fruit cocktail. No two were alike except in their use of marshmallows so I took components from them and made my own.
After deciding on a mixture of pineapple, mandarin, cherries, coconut and marshmallows I got to work. Using sour cream to bind it all didn't appeal to me so I used vanilla yogurt and the result was like going down memory lane. The first bite was Ambrosia! It was so easy to prepare and everyone enjoyed it, though I did hear one grumble about the cherries. The recipe can be easily doubled or tripled and makes a great no bake summer dessert. Of course, you can change around the ingredients as you like - it is very forgiving. Give it a try!
Recipe: My Ambrosia
Monday, April 02, 2007
Frozen Peanut Butter Pie
I have never really explored baking with peanut butter much beyond making cookies. Many people I know are fond of the peanut butter and chocolate combination and I enjoy it somewhat. Every now and then, I will indulge in a Reese's Peanut Butter Cup but it is never my first choice.
I have had my eye on this no-bake Frozen Peanut Butter Pie for a while. I wanted to try it out because I don't have much luck with frozen desserts other than homemade popsicles. Everything comes out really hard and difficult to cut. I think this is just a mental block since I like to bake - of course everything is hard, its frozen! The second reason I wanted to try it was to see how it would turn out using natural peanut butter as opposed to regular Skippy or Kraft.
The actual pie assembly was a cinch. Each component was made and then frozen until it was finished. One thing I would do differently is add one more square of chocolate to the chocolate glaze for better pie coverage. Overall, my family liked the pie. It wasn't too sweet and I didn't add extra sugar to compensate for the natural peanut butter (which was very smooth) and it was still tasty. Just let it warm up at room temperature before cutting to soften it up. Impatient cutting leads to broken crust!
Recipe: Frozen Peanut Butter Pie